Quickstart guide
Requirements
- Xcode 16.0 or later (latest stable version available on the App Store).
- Swift 5.9 or later.
- The minimum deployment target should be 15.0.
- Recommended: An SSH key configured locally and registered with GitHub.
Integration
The DevRev SDK can be integrated using either Swift Package Manager (SPM) or CocoaPods.
We recommend integrating the DevRev SDK using Swift Package Manager and SSH. CocoaPods is in maintenance mode since August 2024 and will be deprecated in the future.
Swift Package Manager
To integrate the DevRev SDK into your project using SPM:
- Open your project in Xcode and go to the Add Package Dependency.
- Enter the DevRev SDK URL under Enter Package URL:
- For SSH:
git@github.com:devrev/devrev-sdk-ios.git(recommended) - For HTTPS: https://github.com/devrev/devrev-sdk-ios
- For SSH:
- In the Build Phases section of your app target, locate the Link Binary With Libraries phase and confirm that
DevRevSDKis linked. If not, add it by clicking + and selectingDevRevSDKfrom the list.
Now you should be able to import and use the DevRev SDK in your project.
CocoaPods
To integrate the DevRev SDK using CocoaPods:
- Add the following to your Podfile:
pod 'DevRevSDK', '~> <VERSION>' - Run
pod installin your project directory.
This will install the DevRev SDK in your project, making it ready for use.
Set up the DevRev SDK
- Open the DevRev web app at https://app.devrev.ai and go to the Settings page.
- Under PLuG settings copy the value under Your unique App ID.
- Configure the DevRev SDK in your app using the obtained credentials.
The DevRev SDK must be configured before you can use any of its features.
The SDK becomes ready for use once the configuration API is executed. Remote configuration is fetched from the backend and cached locally. On subsequent launches, you can use the cached configuration to avoid a network round-trip and speed up cold start (see Configuration caching).
DevRev.configure(appID:)To provide a feature configuration during setup, call the overload that accepts it:
DevRev.configure(appID:featureConfiguration:)For default behavior, call the simpler overload:
DevRev.configure(appID: "abcdefg12345")To customize behavior such as frame capture, auto-start recording, configuration caching, or theme preferences, pass a FeatureConfiguration instance:
DevRev.configure(
	appID: "abcdefg12345",
	featureConfiguration: FeatureConfiguration(
		enableFrameCapture: false,
		autoStartRecording: false,
		alwaysUseRemoteConfig: true,
		supportWidgetTheme: .systemDefault,
		enableSupportChatStreaming: false
	)
)
Update the feature configuration
You can adjust the feature configuration without reconfiguring the SDK:
DevRev.updateFeatureConfiguration(
	FeatureConfiguration(
		enableFrameCapture: true,
		autoStartRecording: true,
		alwaysUseRemoteConfig: true,
		supportWidgetTheme: .systemDefault,
		enableSupportChatStreaming: false
	)
)
Feature configuration reference
FeatureConfiguration controls how the SDK behaves both during initial setup and when calling DevRev.updateFeatureConfiguration(_:).
let configuration = FeatureConfiguration.default| Property | Type | Default | Description |
|---|---|---|---|
enableFrameCapture | Bool | true | Enables the screen capture pipeline used by session replay. |
autoStartRecording | Bool | true | Automatically starts recording after the SDK finishes remote configuration (or when using cached config). |
alwaysUseRemoteConfig | Bool | true | When true, the SDK always fetches remote configuration at startup and when the app enters background. When false, the SDK uses cached configuration when available and skips the remote fetch, improving cold start. |
supportWidgetTheme | SupportWidgetTheme | .systemDefault | Controls the appearance of the in-app support widget, including dynamic theme behavior. |
enableSupportChatStreaming | Bool | false | When true, enables real-time AI agent response streaming in PLuG conversations (WebSocket streaming, optimistic UI, animated text). |
supportWidgetArticleSearchFilters | ArticleSearchFilters? | nil | Optional filters for PLuG article search (widget and CMDK). Applied automatically when the support widget is ready. |
maskAllTextByDefault | Bool | false | When true, every view that displays text — including labels, buttons, and SwiftUI Text views — is automatically masked in session recordings. When false (the default), only text input fields (UITextField, UITextView) are auto-masked. |
Use the designated initializer to override any combination of options:
let configuration = FeatureConfiguration(
	enableFrameCapture: false,
	autoStartRecording: false,
	alwaysUseRemoteConfig: false,
	supportWidgetTheme: .systemDefault,
	enableSupportChatStreaming: true,
	supportWidgetArticleSearchFilters: myFilters,
	maskAllTextByDefault: true
)
When you only need to toggle frame capture while preserving the current runtime values for other options, use the convenience initializer:
DevRev.updateFeatureConfiguration(
	.init(withShouldEnableFrameCapture: false)
)
When you only need to change the support widget theme, use the convenience initializer that preserves the current values for other options:
DevRev.updateFeatureConfiguration(
	.init(witCustomSupportWidgetTheme: .systemDefault)
)
Configuration caching
When alwaysUseRemoteConfig is false, the SDK uses the last successfully fetched configuration stored on the device. If a cached configuration exists, the SDK skips the remote config request at startup and applies the cached settings (for example, session replay, observability). This reduces cold-start latency and allows the app to work offline with the last known config. The first launch (or after clearing app data) still performs a remote fetch when network is available. Set alwaysUseRemoteConfig: true (the default) to retain the previous behavior of always fetching remote configuration at startup and when the app enters background.
Support widget theme options
SupportWidgetTheme lets you fine-tune the support UI. Start from .systemDefault or provide explicit values:
let customTheme = SupportWidgetTheme(
	prefersSystemTheme: false,
	primaryTextColor: "#1F2933",
	accentColor: "#F97316",
	spacing: [
		"bottom": "20px",
		"side": "16px"
	],
	conversationPageOptions: ConversationPageOptions(
		headerText: "DevRev Support",
		subheaderText: "Typically replies in minutes"
	)
)| Property | Type | Default | Description |
|---|---|---|---|
prefersSystemTheme | Bool | true | Follows the device appearance when true; otherwise uses your custom colors. |
primaryTextColor | String? | nil | Hex or RGB value for primary text in the support widget. |
accentColor | String? | nil | Hex or RGB value applied to buttons and highlights. |
spacing | [String: String]? | nil | CSS-like spacing overrides ("bottom" and "side" keys are recognized). |
conversationPageOptions | ConversationPageOptions? | nil | Customizes the conversation page header and subheader text. |
ConversationPageOptions controls branding on the support chat conversation page:
| Property | Type | Default | Description |
|---|---|---|---|
headerText | String? | nil | Custom text for the conversation header. Uses the server default when nil. |
subheaderText | String? | nil | Custom text for the conversation subheader. Uses the server default when nil. Pass a single space (" ") to render a blank subheader. |
- For UIKit apps, configure the SDK in the
AppDelegate.application(_:didFinishLaunchingWithOptions:)method. - For SwiftUI apps, depending on your app's architecture, configure the SDK at the app's entry point or initial view.
Use the sample app
A sample app with use cases for both UIKit and SwiftUI has been provided as part of our public repository.
Before you start using the sample app you need to configure it to be used with your Apple Developer team and your DevRev credentials. For your convenience the code is marked with compiler error directives (#error) at the places that need attention.
- Add your credentials to the relevant
AppDelegate.swiftof the SwiftUI or UIKit sample.- After you have added the credentials, delete or comment out the compiler error lines in the respective files.
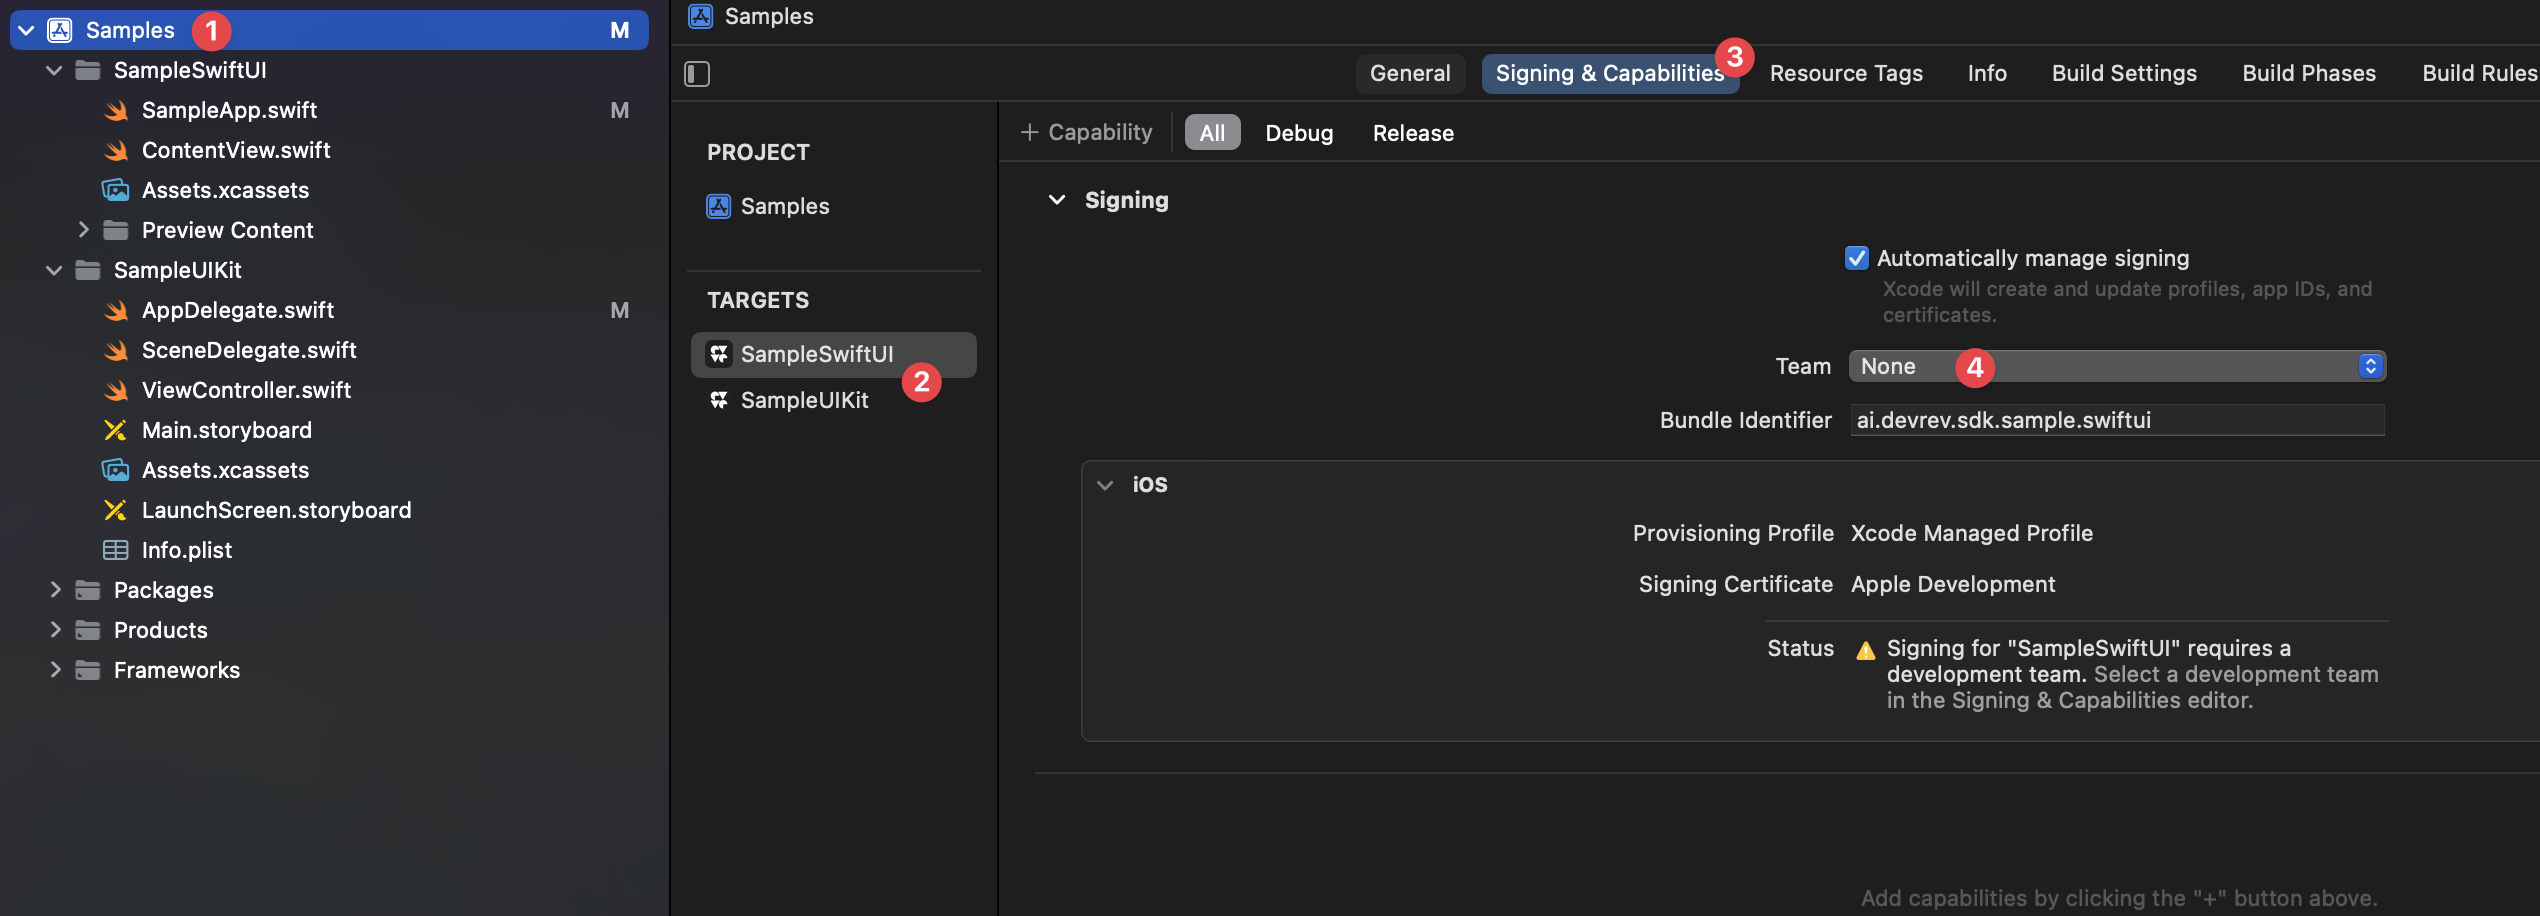
- Configure the code signing for the sample target:
- Open the project settings (1),
- Select the appropriate target (2),
- Go to the Signing & Capabilities section (3), and
- Select your development team under Team (4).
Last updated on